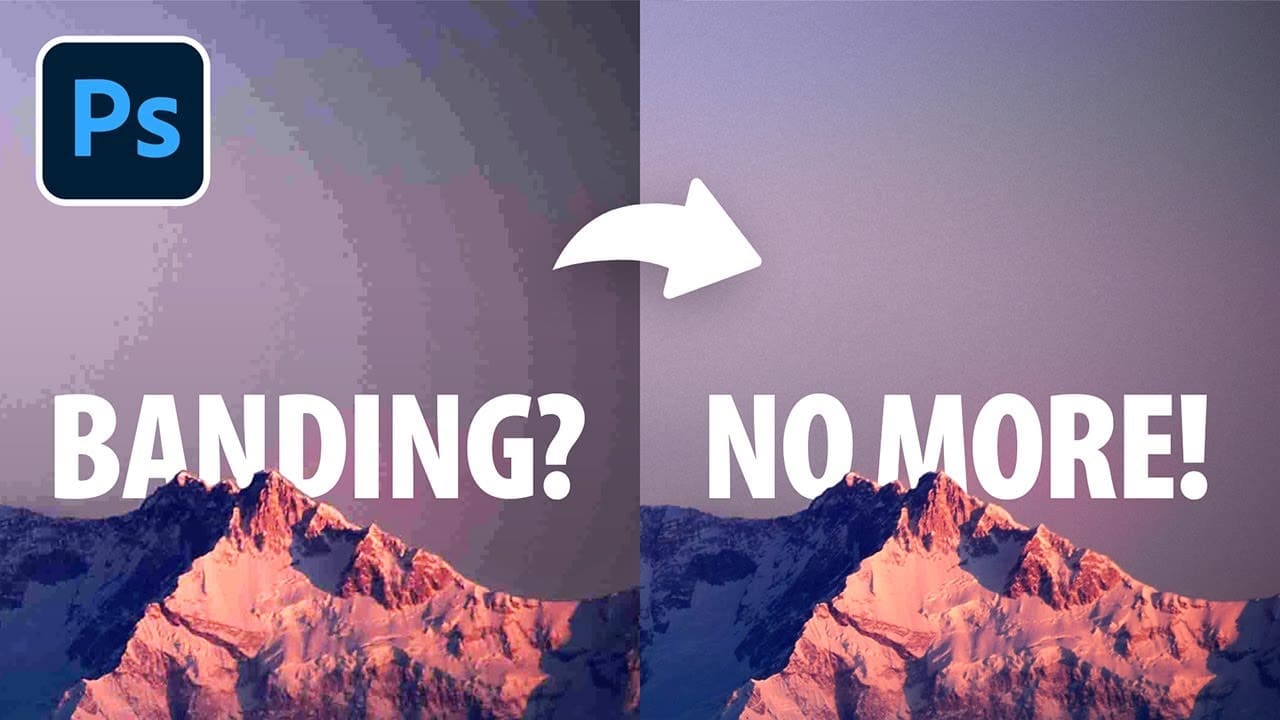
Conquering Banding in Photoshop: A Step-by-Step Guide
In the realm of digital editing, encountering banding in your images can be a common yet frustrating issue. Banding often detracts from the smoothness and quality of your images, leaving behind unwanted streaks or lines. Fortunately, with a few easy steps, you can remove and prevent banding in Photoshop, ensuring your images maintain their pristine quality. Whether you’re a seasoned professional or a budding photographer, these tips will elevate your editing game.
Step 1: Embrace the Power of 16-Bit
The first and most crucial step in preventing banding is to work in 16-bit mode. While it might seem insignificant, this simple switch can make a world of difference. Images edited in 8-bit mode are more prone to banding, especially when adjustments stack up. This is because 8-bit images have a limited color range, which can result in visible transitions between colors. Switching your image mode to 16 bits per channel increases the color range, thus smoothing out these transitions and effectively eliminating banding. To change your image to 16-bit, simply navigate to Image > Mode > 16 Bits/Channel.
Step 2: Clever Use of Blurring Techniques
Banding typically occurs in areas with smoother transitions and lesser details, such as skies or backgrounds. To tackle this, a strategic application of blur can be your best friend. However, blurring the entire image isn’t ideal, as you risk losing precious details in more intricate parts of your photo. This is where surface blur comes into play. By duplicating the background layer and applying a surface blur (Filter > Blur > Surface Blur), you can selectively smooth out banding while preserving the details in areas that matter. Adjusting the threshold and radius settings allows you to fine-tune the effect, ensuring a natural and banding-free result. Tools like Luminar Neo and Envato Elements offer additional resources and tutorials for mastering blurring techniques and enhancing your photos’ overall quality.
Step 3: Adding Texture to Maintain Realism
While removing banding is essential, maintaining the realism of your image is equally important. Smooth areas devoid of any texture can appear unnatural. To counteract this, introducing grain or texture to your image can add depth and authenticity. Creating a new layer set to Overlay blend mode and filling it with a neutral gray allows you to add noise (Filter > Noise > Add Noise) without altering the underlying colors. This technique introduces a subtle, natural-looking texture to your image. For those seeking more advanced options, Dealjumbo and GraphicRiver offer a plethora of textures and overlays that can add that perfect touch of realism to your projects.
Enhancing Your Workflow with Professional Tools
While Photoshop offers a robust set of tools for combating banding, incorporating professional resources like Placeit and Envato Elements into your workflow can significantly enhance your results. These platforms provide access to high-quality textures, overlays, and tutorials, enabling you to take your photo editing to the next level. Whether you’re looking to add unique backgrounds or refine your images with expert techniques, these resources are invaluable for creatives aiming to produce top-notch work.
Conclusion
Banding in Photoshop can be a nuisance, but with the right techniques, it’s entirely manageable. By working in 16-bit mode, utilizing selective blurring, and adding texture, you can ensure your images are free from banding and full of life. Remember, the key to mastering photo editing is experimentation and continuous learning. With platforms like Luminar Neo and Envato Elements, you have a wealth of resources at your fingertips to explore and enhance your skills. So, dive in, get creative, and watch your images transform.
Downloads
Sample Image: https://www.pexels.com/photo/white-and-black-mountain-wallpaper-933054/ (Banding Increased for Tutorial)
Timestamps
00:00 Step 1 – Why 16-Bit?
00:57 Step 2 – Selective Blur
05:27 Step 3 – Add Texture
08:13 Quick Recap


@shersistudios
Its my favourite channel ❤
@gregs6424
The problem with this is it causes Photoshop to lag like crazy when you save your file. Takes way too long. And your file size increases a lot too. A simple file like like goes over 1 GB easily. Don't work in 16 bit unless you need to.
@alanm.6096
People have so many jpeg images made with smaller sensors…it’s good to know there are solutions to ‘save’ those treasured images!!
@jm302music
"That is definitely causing banding in my head." 😂 Hilarious comment! I will definitely have to remember that one and use it myself
@coisasnatv
Has no one ever told you that your eyes, your teeth, and everything else are the same color as your skin tone?
@k.7306
Excellent video, very useful advice! Thank you! What about using frequency seperation (using blur on the tones' layer) for banding removal?
@davidfield8122
Having worked in many of the top retouching studios, I can tell you none of them work in 16-bit. It is useful to initially process 16-bit RAW files, but they are always processed down to 8-bit for retouching. THEN, as a very last step, convert back to 16-bit, flatten, then back to 8-bit for the final delivery. What this achieves is to render your adjustment layers in 16-bit. Any banding you may have while working in 8-bit is removed in this final step.
@user-td6wt9xb5w
You always put up great courses, I subscribe and enjoy them.
I had a question about images like this, so thanks for clearing it up
@user-fx4oq6ur2u
Chanel related graphic
@thenorth9159
Sadly, my photos do not have banding but posting them on social media, banding appears lol. Those social media devs should have fixed it.
@aarkestraclub326
Your face looks like real photoshoped😂
@toufeeqtariq
Anupam from Shark tank india
@dhaulagiribgl434
I think you are not that great photoshop instructor
Plzz quit YouTube
@noskillnochill
IS there something wrong with the links for the compositing plugin? its not working for me
@bobbyellis5006
I just have to say, as a professional photographer coming from the photojournalism side of things, I've had to learn a lot of tricks in Photoshop when I got hired onto a marketing department. You've been a life saver for years. I appreciate that you put this stuff up for free and you are a very good teacher on top of things. So, thank you to you and your team.
@VasilisKaramanlis
Why not 32 bit?
@n7dynamics
Thanks for all lifesaving efforts. Congratulating myself as I found you on YouTube!!.
@daemon1143
Quick question: I vaguely remember that switching to 16 bit cause some features to be unavailable or some other problem in Ps. Does anybody know more precisely what I'm talking about, and if it still applies?
@dominocomand
Just a question. At 3:21, is there a reason you created another layer with a mask, instead of painting directly onto the smart filter's mask?
@ShaunBennett
Problem soleved in under 1 min! Love it